
Before the age of power tools and complex machinery, simple machines were used to make work easier and move heavy objects from one location to another. Using leverage, these simple machines can multiply force with few, if any, moving parts.
Simple machines are a great way of introducing children of all ages to fundamental engineering and scientific concepts. They provide a basic understanding of real-world physics that can easily be replicated with at-home experiments.
Check out the list below for examples of simple machine projects kids can try at home.
1. Make An Inclinded Marble Roller Coaster
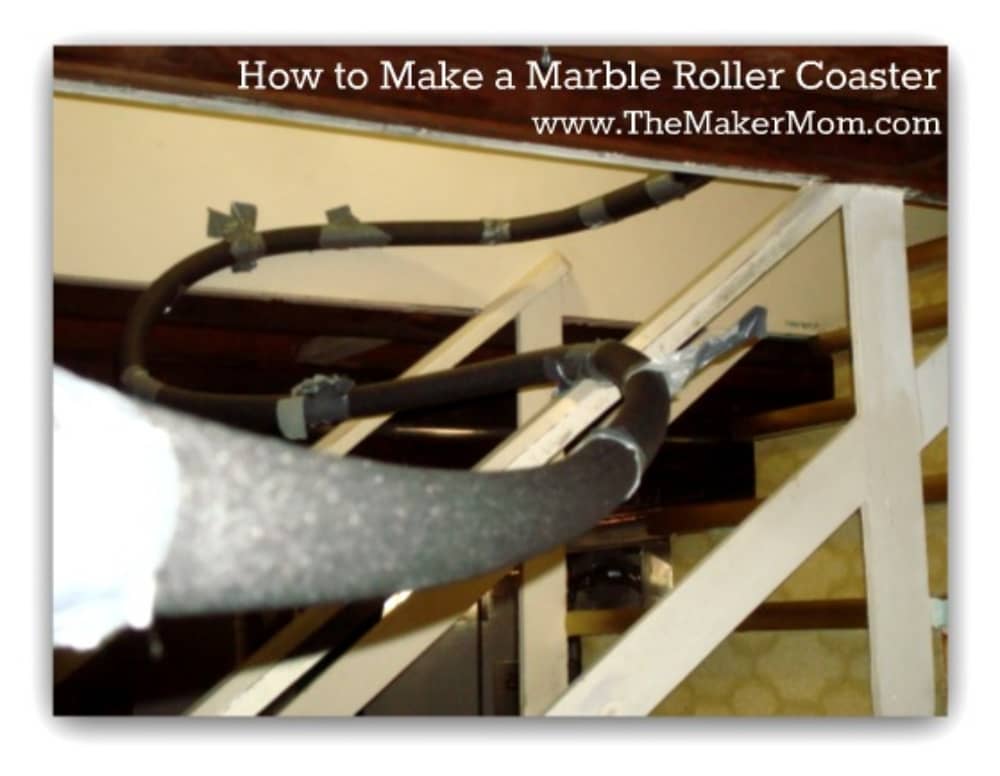
Ramps allow the movement of heavy objects by utilizing a low-angled surface over a distance equal to the required force to lift the objects as needed or shift their force one way. This can be for objects standing still or already in motion and can be easily demonstrated by a roller coaster.
A simple experiment to do at home is to create a marble roller coaster with common materials like foam pipe insulation and duct tape. This fun activity can show them precisely how inclined planes and ramps work and function.
You can read our guide on how we created a marble roller coaster for steps on how to build this simple machine.
2. Wheels and Axles DIY Cars
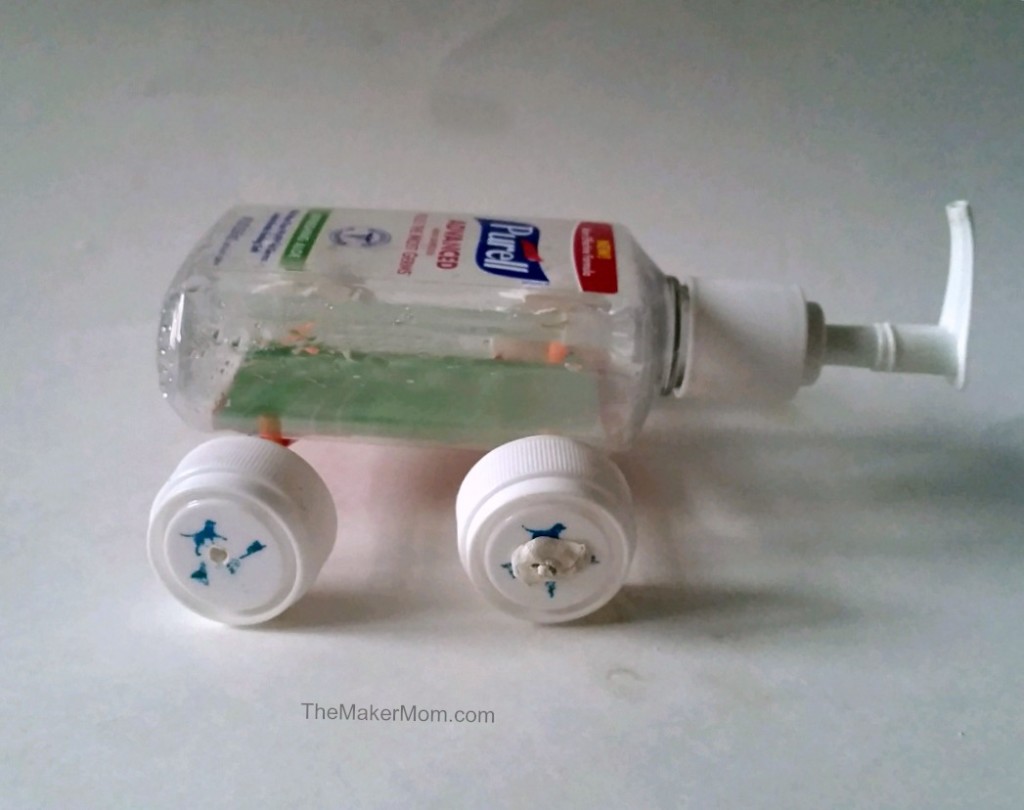
Wheels and axles are the perfect way to demonstrate mechanical advantage. These simple machines are used to move or pull things over distances. A stationary axle that can rotate is placed through a wheel with a radius larger than it.
Force applied to the larger wheel can transfer to the axle in direct proportion to their relative ratios, which is why cars with bigger wheels can reach higher speeds. For example, if the wheel has a radius 3 times larger than the axle, it can apply 3 times the force of the axle by itself.
Kids can apply this knowledge to a real-world experiment by creating small-scale toy cars with two axles and four wheels for movement. We did this project where we created a toy car from recycled materials, including a sanitizer bottle. We simply used plastic water bottle caps for the wheels and a pencil for the axle.
3. Create A Simple Pulley System

A pulley system uses a rope put over a notched wheel on an axle to transfer power in a specific direction. When you pull on the rope from one end, it can reduce the amount of force needed to lift the load directly to the other side.
Kids can make a simple pulley at home with a wire reel, a rod for an axle, a rope, and a small container of any sort that can be attached to the rope’s end. The rope has a small container attached to it and is draped over the reel.
By pulling on the end without the weight, students can see how various angles change how much force is necessary. This simple machine project provides them with good insights into geometry and physics.
4. Make A Catapult Lever
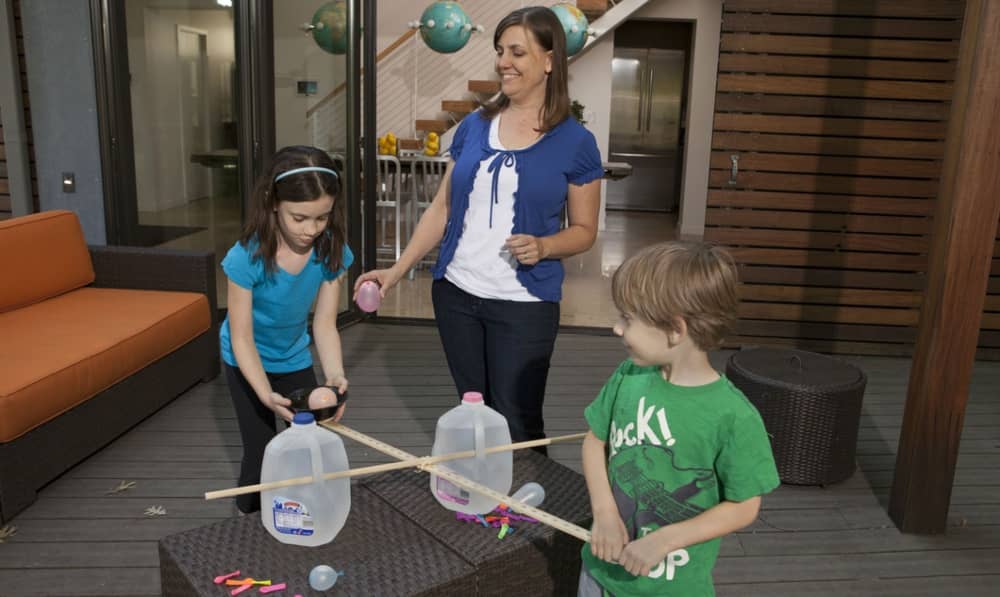
A lever allows you to lift heavy objects with relatively light force by applying the use of a longer rigid structure and a fulcrum.
A catapult is an excellent example of how a lever can move or throw an object for long distances. Kids can try this out with water balloons and a few common items found around the house. In this water balloon catapult project from children at MSI Chicago, they added yardsticks between gallons of water, taped small paper bowls on two ends, and used them to launch water balloons.
It’s a good project for elementary and middle school students.
5. Make An Incline Plane With Books
An inclined plane is used to transfer heavy objects vertically easier. By moving the object at a low angle from the ground to the desired height, the same amount of work can be spread out over a distance as opposed to one straight lift.
One easy experiment to demonstrate how useful an inclined plane can be is using a stack of books, a ruler, and a ball. Place a stack of books down and have your child use two fingers to squeeze and put the ball on top of the books.
Then, put one end of the ruler on the books and the other on the floor to create an angle. Now have your children use their fingers to slowly push the ball up from the end of the ruler on the floor and roll it up the ruler until it’s on top of the books.
In this case, it will show them how much less energy is required (even if the ball weighs very little) to move things around with inclined planes.
6. Use Nut and Bults To Show Screws Simple Machines
We all know the importance of screws and how they can help hold things together. A screw takes rotation energy and converts it into a linear movement. This movement can be used to transfer contents from one place to another.
The simplest example for kids to understand is a nut and bolt. Attach the nut to the threaded end of the bolt and rotate the nut to show it moving up or down the bolt. This shows the transfer of energy from the rotation of the nut into the linear movement of the bolt itself.
You can also get really creative with this and do a bunch of other funky simple machine projects like this paper plate marble track.
7. Wedge Simple Machines
The humble wedge utilizes the geometry and force of two planes to break things apart. When you apply pressure to one side, it converts to energy at the pointed end, allowing it to separate things in its way.
A fun project to try is to gather clay and ask students to try and cut it in half with their flat palms. They’ll quickly realize it’s not easy. If you try it with your palms sideways, it makes things much better. Now, if you have them try something sharper like scissors or a butter knife, they’ll learn how big of a difference it can make.