
How To Set Up a Lego Wall for Your STEM Classroom
The following is a guest post from Dr. Jacie Maslyk.
Always looking for fun ways to engage your students? Do your students enjoy building?
Maybe you should consider adding a Lego wall in your STEM classroom or makerspace! This post will share everything you need to get started, as well as some examples from educators who have already added a building wall to their space.
Where to Start
Before you jump right into a Lego wall project, you need to make some decisions first. Do you want this to be a permanent fixture on your wall or do you want something that offers more flexibility and movement? You will need to survey your space and determine what will work best for the room and your students.
If you work with primary students, you may want to use a wall lower to the floor so that it will be accessible. Maybe you are limited on space and want to make better use of an awkward space like the area below your board. Trish Stanton (aka Mrs. STEMtastic) created the perfect spot for her students to sit on the floor and build.

Trish Stanton
If you decide on a permanent wall, next you will need to choose your location and determine the best size. You may even use a bulletin board space for your next Lego creation. If you want a space for several students to be able to work at once, you will need an area that will provide enough work space.
Then, think in terms of baseplates. Large plates are 10x10. You might want to try out different configurations like 4x2 or 3x3 for a smaller area or 4x6 for a larger wall.

Not sure? Include your students in the process! Not only will they enjoy being part of the design, but they will also apply some math skills.
Installation
OK, so you have your spot and you’ve measured out how many base plates you need. Now what? How do you install them? Some teachers adhere the plates to a board that can be mounted to the wall. Others attach the base plates directly to the drywall.
Before you install anything, it might be best to talk to your custodial or maintenance staff. They may have a good idea for getting your wall into place and might even offer to help!
Here, the baseplates are glued and nailed to a board, then mounted to a wall. Love the added hook for the Lego separator!

Michelle Bass
Erik Murray @MrSTEMurray shared on Twitter: “The best way to connect them to the wall is liquid nails!” If liquid nails sound intimidating and permanent is not the route for you, then you might consider something that offers a little more flexibility. You can still provide an opportunity for students to build in your classroom but keep things mobile.
Anita Timpson (Twitter @MrsATimpson) “I did have a Lego wall…5x4 squares. After the second year, I took it down because not all my students could access a spot to work on. I then stacked the panels in a pile next to drawers of Lego. Students could then grab a panel, some Lego, and work wherever in the library. Worked great!”
Make it Mobile
There are different ways to provide your students with the chance to build without permanently altering your wall. Susan Spigelmire created personal-sized building boxes. With Velcro dots to adhere the mini-plates, these are perfect for learning centers, station work, or individual creation time.

Susan Spigelmire
Looking for more options to make the learning mobile? Heidi McGregor created these larger “take and make” boards for her students. She shared on Twitter: “The backing for each panel is ⅛ inch hardboard with 4 four peel and stick LEGO baseplates to make a 40"x40" building space. Then I cut out handles on top that are lined with duct tape. I use Command hooks to hang them up.”
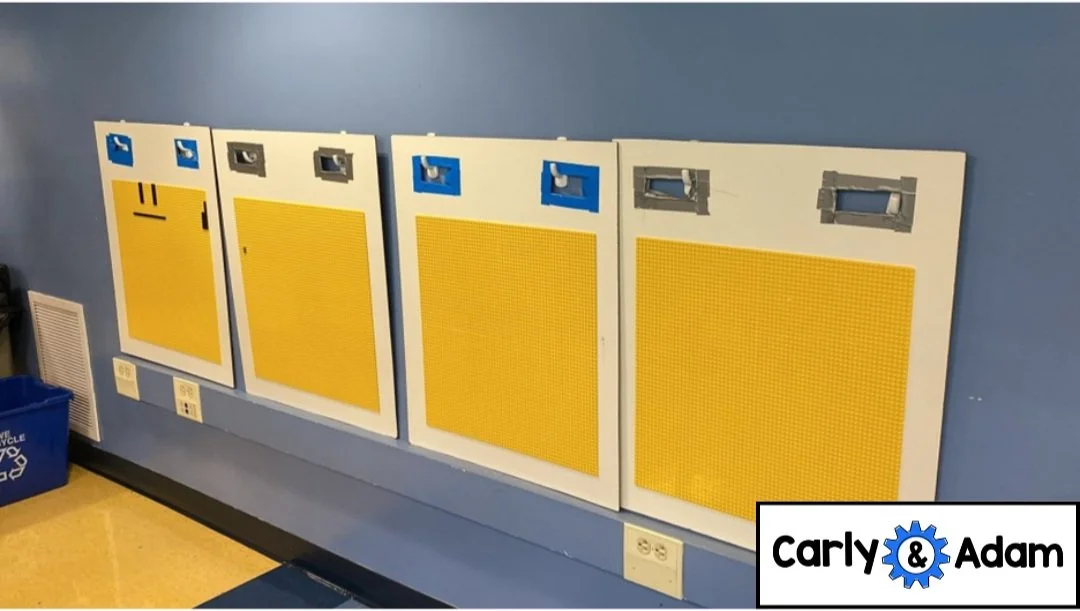
Heidi McGregor
Christine Dixon shared a similar solution using magnetic backing and a pegboard. By adding a little magnetic tape to one baseplate, the items can be easily placed on the pegboard and stored for the next use.

Christine Dixon
Don’t have a ton of space? A small corner like the one created by Brittany Candela might work for your students. Using the side of a storage cabinet, it’s just enough room for partners to sit and create together.

Brittany Candela
Get Your Brick On!
Teacher Michelle Bass shared “My kids love the wall! Sometimes it’s a free build. Sometimes it’s a class project. We just cleaned the wall off yesterday for our upcoming project that was inspired by Twitter. Kids designed Lego animals and will now build 3D habitats on the wall.”
Building walls or boards or boxes allow students the opportunity to express their creativity. These can be used during center time or embedded within a lesson. Builds can be based on student interest or connected to a design challenge that you have established for them. Building walls can be a way for students to gather and talk about what they’ve learned or as a way to map out a future creation. Need Lego lesson ideas? Check out the guest post by Erik Murray.

Michelle Bass
Project Inspire at the Steilacoom School District shared their hallway-sized Lego wall. “ We used command strips for ours. With over 170 baseplates hung, we created a giant school-wide Lego wall! It has been used so much already by students after 5 days of school and we cannot wait for it to continue to fill up! What a great way to invite everyone in the school community to get in on the fun.

We all know that Legos can get expensive. Find ways to get the materials you need without breaking the bank. Stop by yard sales or flea markets. You don’t need complete sets, so some missing pieces won’t limit the creative play in your classroom. See what you can pick up at a bargain price.
Don’t hesitate to reach out to parents and community members to ask for donations. Hold a Lego drive and have families drop off old sets of Legos that can be used within your classroom.
With a spirit of play, Lego walls are a great way to get students using their imagination. They can activate new ideas, collaborate with friends, and create something new.
Have more questions or need additional resources?
Download our Free STEM challenges from our Free STEM Resource Library.
Join our Free Facebook Group.
For more STEM ideas, inspiration, and collaboration with other STEM teachers be sure to join our FREE Facebook group Elementary STEM Teachers with Carly and Adam!

We hope you have found this blog post helpful. To stay connected with Carly and Adam's teaching tips and classroom freebies be sure to follow us on Facebook, Pinterest, Teachers Pay Teachers, and subscribe to our blog!

An educator for the last 23 years, Dr. Jacie Maslyk, has served as a classroom teacher, reading specialist, elementary principal, and assistant superintendent. She is the author of STEAM Makers: Fostering Creativity and Innovation in the Elementary Classroom, Connect to Lead: Power Up Your Learning Network to Move Your School Forward (ISTE), Remaking Literacy: Innovative Instructional Strategies for Maker Learning and Unlock Creativity: Opening a World of Imagination With Your Students. You can read more on her blog, Creativity in the Making, at www.jaciemaslyk.blogspot.com. Connect with Jacie on Twitter @DrJacieMaslyk or email her at jaciemaslyk@gmail.com .