In the digital age, technology has become an essential part of our everyday life. From the toys we play with to the cartoons we watch, technology is everywhere. It’s like having a magic wand that can do almost anything! But to make this magic work better, even the youngest among us need to learn how. As a result, it is important to know why “coding for kids” is a must.
It’s like teaching 4-7 years kids how to talk to computers and use technology to create new, fun things with it. Learning about computers, coding, and AI education can make things even more exciting and fun.
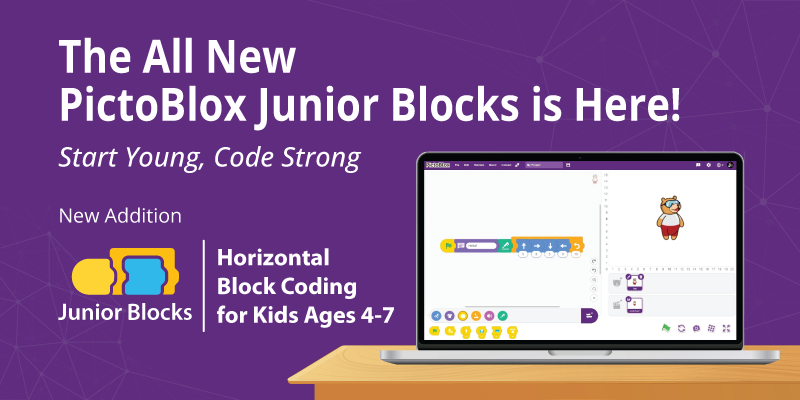
Seeing these growing needs, STEMpedia, the driving force behind K-12 education, has created Junior Blocks in PictoBlox, especially for classes 1 and 2. So, let’s dive in and understand the components of PictoBlox Junior Blocks!
What are Junior Blocks in PictoBlox?
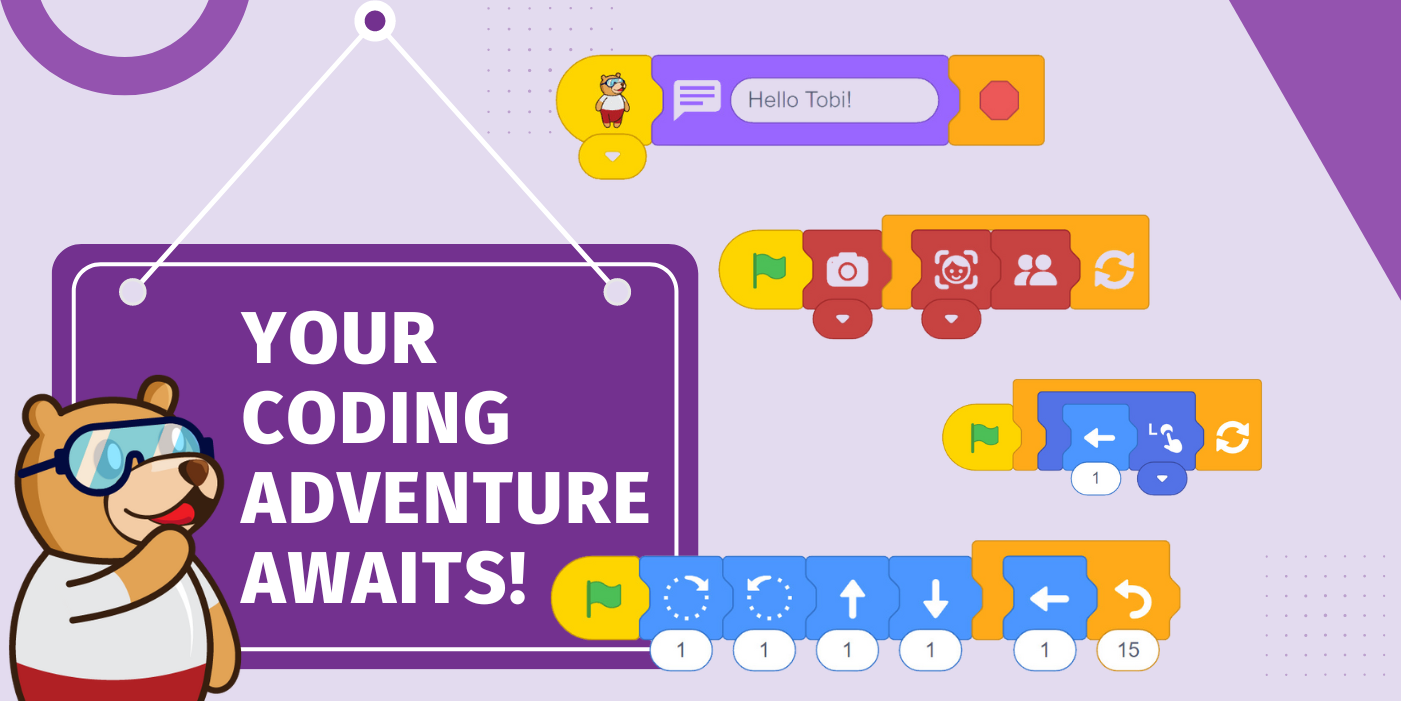
PictoBlox Junior Blocks is an innovative horizontal Block coding software for kids, specially designed for first and second-graders. Unlike older children, who can understand words and follow textual instructions, young children learn through recognition and hands-on experiences.
Catering to their unique learning styles at this stage, PictoBlox Junior Blocks features a user-friendly interface that doesn’t rely on reading or writing skills. As a result, kids can learn at their own pace, exploring and experimenting with coding concepts without any prior requirements.
Its easy-to-use interface and story-based learning turn coding into an adventure. Kids can bring their own stories to life or control robots, making it the best block coding platform for kids. PictoBlox supports 50+ languages, making online coding for kids globally accessible. This versatile tool introduces the basics of block coding for kids early on. As a result, students develop critical thinking, creativity, collaboration, and communication, the four Cs of the 21st-Century Skills!
If you’re exploring coding games for kids or online coding for kids, PictoBlox Junior Blocks is your go-to platform for the world of creativity and fun learning.

Follow the simple steps shown above to enhance creativity and problem-solving skills with coding for kids.
PictoBlox Junior Blocks helps students become independent and confident, providing a safe, engaging, and excellent coding platform for kids to explore coding at their own pace.
The software helps students develop Foundational Numeracy, Literacy, and computational thinking skills. Upcoming extensions will enable teachers to use PictoBlox to teach number systems, Vedic math, sentence formation, and more.
Click here to try the all-new PictoBlox coding for kids ages 4–7.
Let’s Understand the Interface of PictoBlox Junior Blocks
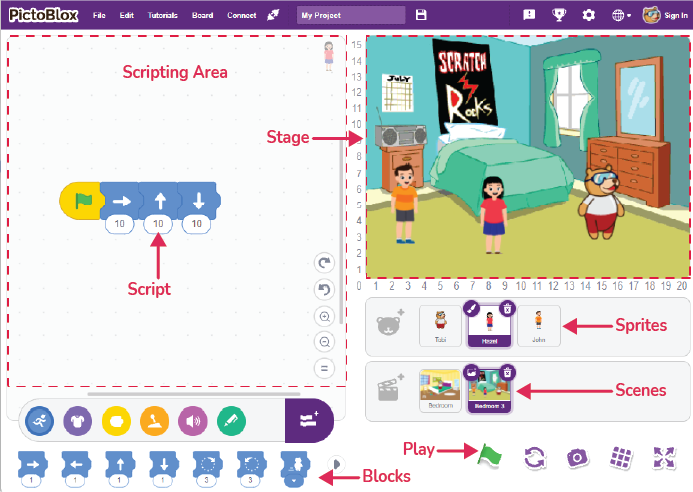
Now, let’s explore the components to understand how to navigate and utilize Junior Blocks in PictoBlox effectively.
The Right-Hand Side of the Navigation Bar

Let’s see what we have got here:
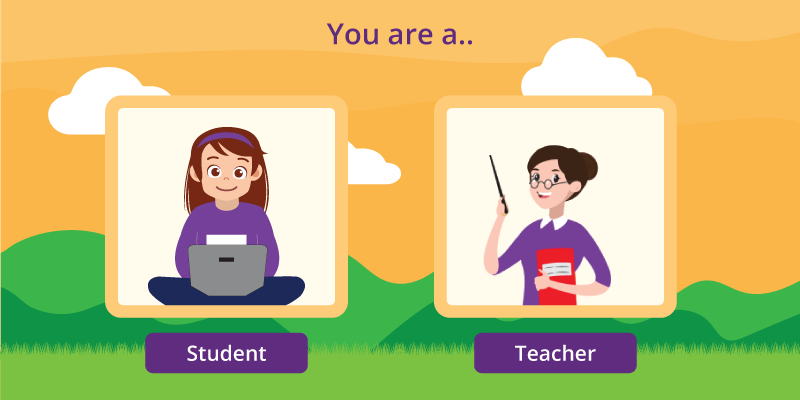
- Sign In: The first thing you must do after getting into PictoBlox is Sign In using your Username and Password. If you don’t have one, you can make a new account. You can choose if you’re a student or a teacher
- Choose your Language: Set the language of your choice. PictoBlox coding for kids now supports 50+ languages, including Hindi, French, German, Portuguese, Turkish, etc
- Settings: You will find the getting started guide for PictoBlox, check for updates, Bluetooth/Audio/Video settings, technical support, and more
- Winner’s Column: Find out which students have excelled in Codeavour 2022, the world’s biggest AI, robotics, and coding competition for students
- Feedback Icon: If you have any ideas or want to say something about PictoBlox’s Block coding for kids, you can tell the people who made it by clicking here
The Left-Hand Side of the Navigation Bar

Here’s a simplified breakdown of what you’ll find on the left side of the navigation bar:
- File: Here, you can begin by managing your coding projects for kids. Save your work, open/share previous projects, and access helpful guides and examples. You can also find a block guide to understand how different functions work and use the built-in screen-recording option to capture your coding journey. PictoBlox has an in-built screen recording to enhance coding for kids. Click here for a step-by-step guide
- Edit: Fix mistakes or change things you’ve done. For example, you can undo something you didn’t mean to do
- Tutorials: Learn how to use PictoBlox junior blocks with step-by-step guides
- Board: Choose which robot you want to use for your coding projects. You can pick Quarky or Wizbot
- Connect: Connect your computer to the robot using wires (USB) or wirelessly using Bluetooth
- My Project: Here, you can give your project a new name and save it. Just click on the right side of “my project” to save
Coding Stage for Kids
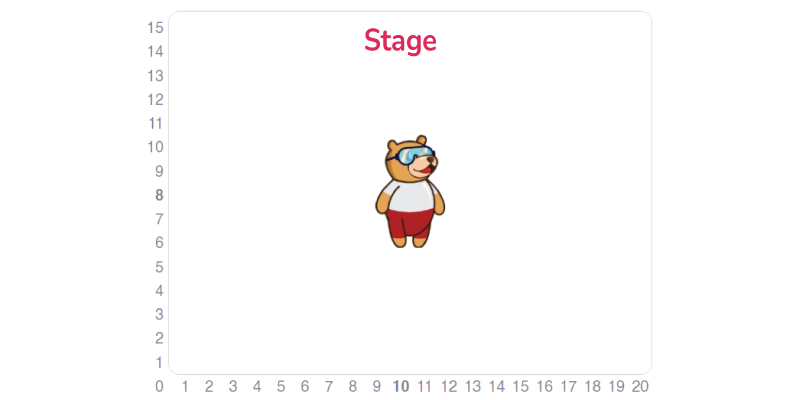
Welcome to the “Stage“!
This is where all the fun happens. It’s like a magical theater where your characters, objects, and signs come to life!
Whatever you do in the coding space, you’ll see it happen right here on the stage. If you spot any mistakes while creating your game or story, don’t worry! You can always use the coding space to fix them up.
Just make sure to save your project to show off your amazing creativity to your friends and family!
Let’s get ready to bring your imaginations to life on the stage!
Blocks and Palettes
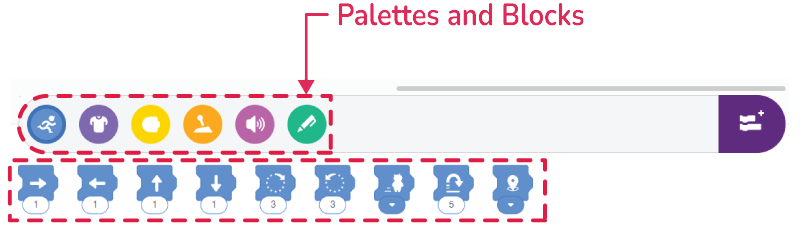
Blocks in PictoBlox are like magical puzzle pieces. You can simply drag and drop them to create games or stories, making coding for kids easy and fun. Blocks allow characters to move, talk, and more, unlocking endless creativity.
Similarly, pallets are like big groups or categories of blocks. For example, the motion palette contains all the blocks needed to make sprites move in various directions.
Motion Palette
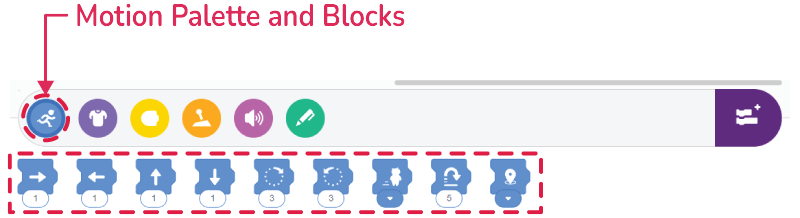
The coding for kids’ blocks under the motion palettes controls a sprite’s movement. These blue blocks help you bring your sprite to life with cool movements!
- Go right: Make your sprite move to the right by a specific number of squares
- Go Left: Move your sprite to the left by a specific number of squares
- Up: Move your sprite up by a specific number of squares
- Down: Move your sprite down by a specific number of squares
- Rotate right: Rotate your sprite clockwise by a specific amount, just like turning your hands on a clock
- Rotate left: Spin your sprite anti-clockwise by a specific amount
- Hop: Make your sprite jump up and down again
- Move to a position: Move your sprite to a specific spot on the grid
- Set speed: With coding for kids, you can control how fast your sprite moves, choosing from slow, normal, or fast speeds
Looks Palette
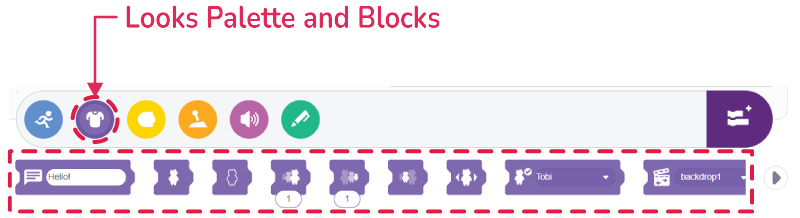
With these purple blocks, you can make your sprites look exactly how you want them to!
- Say: Shows a specified message in a speech bubble above the selected sprite
- Show: Make your sprite fully visible on the stage
- Hide: Make your sprite disappear from the stage as if it’s invisible.
- Grow: Make your sprite look bigger with the all-new horizontal Block coding for kids.
- Shrink: Make your sprite smaller.
- Reset size: Bring your sprite back to its original size.
- Next costume: Change your sprite’s costume to the next one in line.
- Change costume: Pick a specific costume for your sprite from the options available.
- Change scene: Switch to a different scene on the stage as specified from the options.
Events Palette
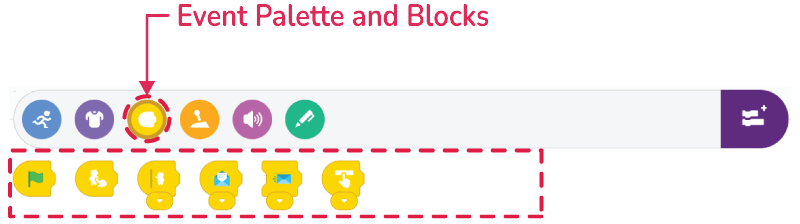
These yellow blocks are like the start switches for your coding projects. They get things going and make coding for kids happen! You can start/trigger the actions with clicks/buttons.
Green flag: Start your coding script when you click the green flag.
- Start on Sprite clicked: Begin your script when you click the sprite
- Start on touching object: Start your script when your sprite is touched by another sprite
- Start on message received: Activate your coding for kids’ script whenever a specific color message is received
- Send Start message: Send a message of a specified color to trigger other parts of your project
- Start on the key pressed: Kick off your script whenever you press a specific key on the keyboard
Control Palette
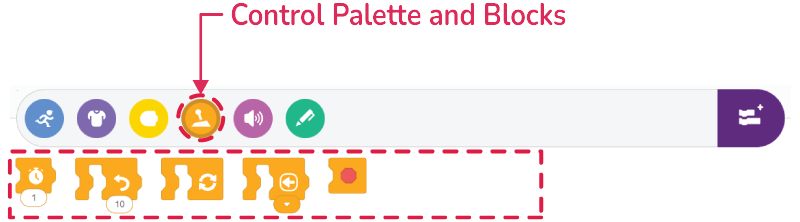
These orange blocks help you keep your project running smoothly, whether you want things to happen in order or more unexpectedly!
- Wait: Pause your script for a few seconds, allowing things to happen
- Repeat: Run a set of blocks several times, like looping a video clip
- Repeat forever: Keep running your script in a loop, over and over again, until you hit the stop button (🛑)
- Stop: End all the scripts running on your sprites, stopping everything
- When key pressed: Trigger your script to run when a specific key on the keyboard is pressed, like playing a game with arrow keys
Sound Palette
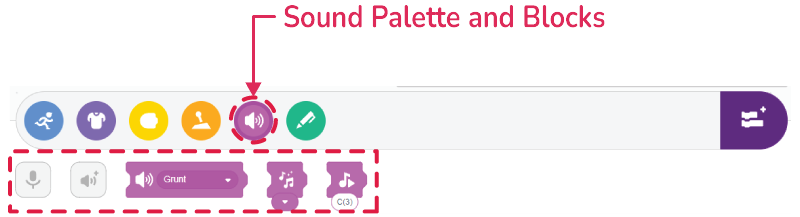
Coding for kids becomes even more fun with these pink/magenta blocks. They add sounds and music to any project, from games to background tunes or just for fun!
- Record sound: Capture a sound using your microphone so you can use it in your project
- Add sound: Choose a sound from the library or your downloads and add it to your list of available sounds
- Play sound: Make a specific sound play from your list of sounds
- Set Instrument: Select the instrument you want to use for the upcoming musical note
- Play note: Create beautiful music by playing a specific musical note according to your chosen instrument
Pen Extension Palette
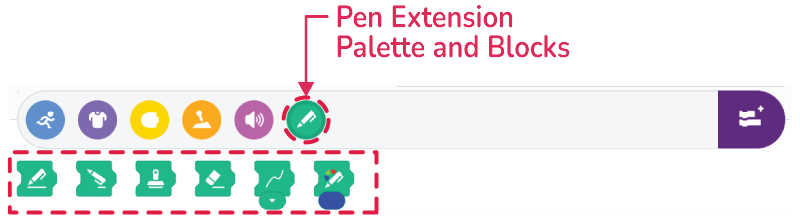
In Junior Block coding for kids, use the green blocks to manage your project’s pens and drawings. Unleash your creativity and craft incredible artwork on the stage!
- Pen down: When this block is used, the sprite will draw lines on the stage as it moves
- Pen up: Using this block, the sprite will move on the stage without drawing any lines
- Stamp: Create a copy of the sprite’s image on the stage, like making a stamped mark
- Clear: Remove all drawings, stamps, or pen marks from the stage
- Pen stroke: Adjust the thickness of your sprite’s lines
- Pen color: Choose the color of the lines that your sprite draws with its pen
Sprite and Backdrop Editor in PictoBlox Junior Block
![]()
Let’s discuss the Sprite and Backdrop Editor in PictoBlox Junior Blocks!
In PictoBlox Block coding for kids, a sprite is like a character or an object that follows commands to perform actions. Have you met the bear? His name is Tobi, and he is your coding buddy in PictoBlox!
Sprites can have different costumes, looks, or appearances.
Now, in PictoBlox Junior Blocks, you can customize your sprites using the built-in paint editor. After choosing a sprite, click on the brush icon to paint it however you like! You can add emojis and text, reshape sprites, or create different geometrical patterns for even more fun!
Then comes the Backdrops. These are backgrounds for your Block coding projects. You can choose one from PictoBlox, draw your own, or upload an image from your computer. With backdrops, you can set the scene for your coding adventures and make your projects come to life!
More Options in PictoBlox Junior
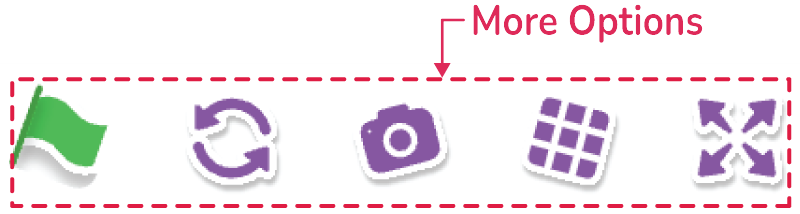
- Green Flag: Clicking the green flag initiates your project, illuminating the entire script to signal that your code is in action
- Reset: This button restores your project to its initial state, undoing any changes made during coding
- Camera: The Camera module unlocks a world of possibilities for block coding for kids. You can utilize your device’s camera for video recording, image capture, color detection, and even face detection
- Grid: The Grid feature overlays a grid onto your stage, helping you align and organize your sprites and backdrops precisely and clearly, ensuring your project looks polished and professional
- Zoom In: Zoom In allows you to magnify the view of your stage, bringing elements closer for detailed editing and better visibility. As a result, it empowers you to work with greater accuracy and control
In a Nutshell

Introducing Junior Blocks in PictoBlox represents a revolutionary approach to teaching horizontal block coding for kids aged 4-7. This software stands out as the best in its class due to its easy-to-use interface, tailored to the learning styles of young children. By combining horizontal block coding with story-based learning and gamification, PictoBlox Junior Blocks transforms coding into an engaging adventure. It’s not just about learning to code; it’s about making learning enjoyable and accessible worldwide.
As we look to the future, PictoBlox Junior Blocks is setting a new standard in early coding education. Thereby empowering the next generation of thinkers, creators, and innovators.